

Famously, the Battle of the Coral Sea was the first naval action where the opposition ships never saw each other. All of the offensive action was carried out by aircraft, particularly the carrier bombers of each side, with ships relegated to purely defensive anti-aircraft gunnery. Aircraft were also required to provide all of the reconnaissance services for both sides. The scout role was one that had been long envisaged for carriers and their aircraft, but at Coral Sea they proved strangely poor in the role – both sides failed to find each other despite sailing in the same confined seas for four days. When enemy forces were discovered they were misidentified, and both Admirals Fletcher and Hara flung strike groups at the wrong target. In answering why these circumstances occurred, it is instructive to more closely examine some of the issues brought to light by the experience of Coral Sea.
Scouting
In the inter-war years, both the US Navy and the Imperial Japanese Navy had regarded carriers as primarily a tool for scouting and reconnaissance. Doctrine called for scout aircraft to locate the enemy fleet and carry out harassing attacks until the main battle line arrived, and specialist scout aircraft were procured, such as the American SBD Dauntless and the Japanese cruiser-launched E13A Type 0. However, during the Battle of the Coral Sea scouting on both sides had been somewhat lacking.
On the 7th of May, both sides were let down by faulty search reports. An American SBD discovered two cruisers from the MO Support Force but a coding error by the crew resulted in a report of two carriers being received by Admiral Fletcher, causing him to launch his initial strike against the wrong target. Although this was an honest error, the incident reveals a number of problems that would plague the Americans throughout the war. Scout aircraft like the SBD and its successor SB2C were quite short-ranged, being able to fly searches at a maximum of around 250 miles from home base. This meant that if they located an enemy carrier force, that force was already within range and had to be attacked quickly before it could launch a first strike of its own. Carrier commanders could not afford to hesitate and wait for more definite information, even if it was more accurate. Coding errors code be reduced by more rigorous training, but short search radii would plague American carriers throughout the war.
Japanese had likewise been let down by their scouts, who had misidentified the Sims and Neosho as carriers leading to their strike of the 7th of May being dispatched against the wrong target. This error was a failure of recognition rather than communication, with the crew of the B5N misreporting the oiler as a carrier. Part of the problem may have been that Coral Sea saw the first time that Japanese carrier-based aircraft were used in the scouting role – the Kido Butai’s two specialist reconnaissance cruisers, Tone and Chikuma (each equipped with 8 scout floatplanes), were at the time in Japan with the rest of the Combined Fleet. Less capable cruisers based in the Louisades attempted to fill the gap, and their second string E7K and E8N floatplanes did provide useful information, but were necessarily far removed from the highly mobile MO Striking Force.
On both sides, land-based searches proved more reliable. These were typically conducted by larger aircraft that were longer ranged, and typically had more sets of eyes to find, identify and verify surface ships. It was a report by an American B-17, flying out of Port Moresby, that identified the presence of the Shoho, allowing Admiral Fletcher to re-direct his strike of the 7th of May to a more valuable target. Japanese H6Ks of the Yokohama Kokutai were less successful in keeping tabs on Task Force 17, having to run the gauntlet of American combat air patrols. Three of the big Kawanishis were shot down by F4Fs during the battle.
Aircraft Performance
On the American side the most severe issue was the lack of available fighter aircraft. Authorised strength for the two carrier based VF squadrons was only 18 F4F Wildcats each, and attrition over the preceding few days meant that just 31 Wildcats were available for the crucial exchanges of the 8th of May. This limited pool was simply not adequate to effectively protect both outbound strike groups and Task Force 17 itself. The fixed-wing F4F-3 would soon be replaced by the folding-wing F4F-4, allowing an increase in fighter strength to 27 aircraft per carrier during the upcoming Battle of Midway and 36 aircraft per carrier by the time that the Guadalcanal offensive opened. However, the F4F-4 would prove an unpopular aircraft, being heavier than its predecessor.
The obsolescent TBD Devastator had arguably its finest performance at Coral Sea. During the Tulagi Raid, a single Mark 13 hit had been enough to sink the destroyer Kikuzuki, whilst both VT-2 and VT-5 had delivered successful attacks on the Shoho on the 7th which doomed her. Both TBD squadrons had escaped loss during the attack on MO Striking Force, having received effective escort from the few F4Fs available to provide close support – however, the poor weather near the Japanese fleet also played a significant role, allowing the bombers to remain hidden until the last moment. The torpedo squadrons had also managed to co-ordinate their attack with the dive-bombing attack, which split the few Japanese fighters. this fortunate set of circumstances would notably not be repeated at Midway.
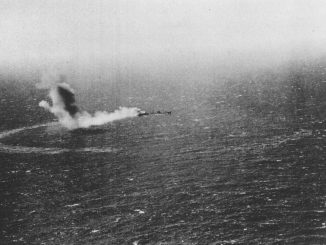
The Mark 13 torpedo had turned in an indifferent performance, giving hints of problems with the weapon. TBDs in the first wave of the Tulagi raid dropped a total of 11 torpedoes against three ships, scoring just a single hit on the Kikuzuki. The transports Azumasan Maru and Koei Maru escaped damage, with some of the Mark 13s launched at them appearing to run deep. The second wave of VT-5 bombers dropped 11 more Mark 13s on the Okinoshima without scoring a single hit. On the 7th of May, at least 7 torpedo hits were scored from 19 drops against the Shoho, but the following day the faster Shokaku was able to avoid 20 torpedoes – the carrier’s top speed of 34 knots being 1 knot faster than that of the Mark 13. In total between 4th-8th of May, 61 torpedoes were dropped with 8 confirmed hits – a 13% success rate. The failures – deep or erratic runs – would prove to be common complaints with the Mark 13 until engineering ‘fixes’ finally produced a reliable weapon in mid-1944.
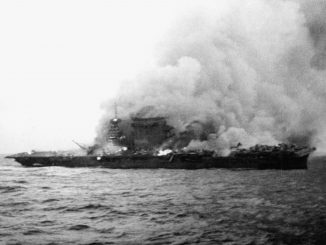
The TBD’s stablemate, the SBD Dauntless, showed signs of the rugged dependability that would become its hallmark. Several Japanese ships were hit and damaged by SBD bombs on the 4th of May, and Dauntless squadrons scored several hits on the Shoho on the 7th of May. With the TBDs failing to hit the Shokaku on the 8th, it was left to the SBDs of both the Lexington and Yorktown air groups to score the three hits that took the carrier out of the battle, and led to her spending several weeks under repair in Japan. These successes were achieved despite some material defects with the aircraft, principally the problem with bombsights that fogged up during dives from high altitude. As a temporary workaround the SBDs were restricted to dives from under 14,000ft to prevent this issue, but later versions of the SBD would be equipped with heaters that eliminated the problem entirely.
Less successful was an initiative to use SBDs as fighters, particularly in the anti-torpedo plane role. Using SBDs in this manner was the brainchild of Lexington’s Capt Frederick C. Sherman, who realised that there was a severe shortage of F4Fs on American carriers. He believed that the SBD was fast enough to deal with the low- and slow-flying torpedo bombers. On the 8th of May it was found that this tactic was unworkable – SBDs on anti-torpedo patrol were sitting ducks for higher flying Zeros, which shot down several Dauntlesses. Thus engaged, the SBDs were ineffectual in dealing with the B5N torpedo planes which went on the deliver the attack which ultimately sank the Lexington. In future battles, with more F4Fs available, this tactic was abandoned.
The Japanese A6M Zero had again proved itself to be superb fighter. Zeros had conducted a vigorous defence of the strike force that sank the Lexington and damaged the Yorktown, shooting down the SBDs used as makeshift fighters that attempted to interfere with the torpedo attack. Other escorts protecting the higher-flying dive bombers kept F4Fs away, forcing them to assume a defensive Lufbery Circle in order to protect each other from the more manoeuvrable Zeros. However, lacking radar and fighter direction support, Zeros proved less able to protect their own carriers despite their rapid climb rate.
In terms of bombers, the D3A reaffirmed its position as the premier ship-killer in Japanese carrier air groups. The by now highly experience crews successfully scored hits on the Neosho, Sims, Lexington and Yorktown, sinking the former pair outright and contributing to the loss of one of the American carriers. The B5N torpedo element had likewise done well, benefiting from superb fighter protection before landing two fatal hits on the Lexington. However, losses during the strike on Task Force 17 were very high, with 21 bombers failing to return from the 51 despatched. This was an early indicator of the fragility of Japanese aircraft, which proved unable to stand up to the increasing firepower installed on American ships and aircraft.
Electronics
Coral Sea was the first major test of US Navy air-search radar. The CXAM had already proved its worth during the ill-fated Japanese attack on the Lexington in February 1942, and it again proved a major asset. The CXAM sets installed on the carriers Yorktown and Lexington, and the cruiser Chester, had performed well, identifying bogeys near Task Force 17. Yorktown’s CXAM had picked up a snooping H6K on the morning of 5th May, which had been dispatched from Rabaul to find the Americans following the Tulagi raid. F4Fs were promptly despatched and subsequently shot down the flying boat – the first of several snoopers that would be destroyed during the battle. The CXAMs of both the Lexington and Yorktown briefly went off line during the attacks of the 8th of May, but the third set aboard Chester was able to take over fighter direction, albeit in limited fashion. Mistakes were made by American Fighter Direction Officers, including not giving the pilots enough information about the anticipated target – on the 8th of May, one CAP section believed it was hunting for torpedo planes, when in fact the contacts they sought were higher flying dive bombers.
In contrast, the only air-search radar fitted to a Japanese warship in May 1942 was a Type 21 set aboard the battleship Ise, which was not present at Coral Sea. Lack of early warning radar allowed VB-5’s SBDs to orbit near the MO Striking Force for 20 minutes on 8th May, hidden in cloud and entirely undetected. It was not until a lookout finally spotted the bombers that CAP Zeros could be alerted to go after the intruders, but too late to prevent the Shokaku being severely damaged in the ensuing attack. Type 21 sets would be added to the repaired Shokaku and battleship Kirishima in August 1942, just before the Battle of the Eastern Solomons.
One drawback of early-1942 vintage radar was an inability to ascertain the identity of aerial contacts. IFF (for ‘interrogate friend or foe’) sets, which responded to radar interrogation by responding with a pulse which clearly identified the aircraft, were beginning to reach the Pacific Fleet by the time of Coral Sea. These devices were known as ABE, which was designed to be compatible with the British Mark II IFF system. ABE responded to the emissions of CXAM such that friendly aircraft were clearly identified on the radar’s A-scope display. Unfortunately these devices were available only in very limited numbers – at the start of the battle only six F4Fs of VF-42 were fitted with the ABE, and two of these were lost when they ditched following the Tulagi raid. None of the SBDs, TBDs or cruiser-launched SOCs were equipped with IFF, which required CAP fighters to continually chase down and visually identify contacts.
Another electronic gadget which saw widespread use by the Americans at Coral Sea was the YE-ZB homing device. A rotating transmitter aboard the American carriers, called YE, sent out coded transmissions which could be decoded by the ZB receiver aboard aircraft. The pilot of the aircraft heard a Morse letter in his earphones that told him the bearing back to the carrier. YE-ZB was a revelation, particularly to fighter pilots who did not have dedicated radiomen to help them with navigation. Several lost pilots relied on their ‘Zed Baker’ to guide them back to home plate, but it was not without its flaws. To tune in to the YE transmission, pilots had to tune their single receiver away from their carrier’s fighter direction circuit. Since FDOs transmitted sparingly and radio sets of the time lacked an autotune capability, it was very difficult for pilots to tune back in to the frequency to receive instructions. Several pilots found themselves unable to retune their radios, leaving them able to transmit but not receive messages. YE-ZB often worked best when pairs of aircraft split responsibility for communications, with one listening for YE directions and the other tuned to voice channels. YE-ZB was also much less reliable close to the carrier, which could be a problem if poor weather concealed the ship from pilot.
The lessons of this experience were acted upon, albeit in limited fashion. The Americans had already begun the process of beefing up fighter strength, but different weather conditions and lack of a co-ordinated escort effort meant that the venerable TBD would finally be exposed as being completely unfit for frontline duty. For the Japanese, Midway would prove the absolute necessity of providing radar for early warning of incoming strikes, something that had been hinted at by the Coral Sea experience. For both sides, there was very little time to absorb lessons of Coral Sea before the climactic Battle of Midway began less than a month later.

Leave a Reply