

The Japanese, having completed their conquest of the Netherlands East Indies and Malaya, began to look at activating second-stage operations that would help to secure the perimeter of their new possessions. In April 1942 the Japanese Army and Navy together agreed on a plan to seize Port Moresby on the south coast of New Guinea. Taking this colonial capital would give Japan control of the Coral Sea, allowing it to control the sea lanes towards Australia and possibly even provide a platform for the invasion of that island. Alternatively, taking Port Moresby would allow Japanese forces to turn towards Fiji and Samoa, giving them the chance to completely isolate Australia from her Allies. The plan was codenamed Operation MO.
A subsidiary portion of the MO plan called for the seizure of Tulagi, on Florida island in the British protectorate of the Solomon Islands. Tulagi was the capital, although almost all of the civilians had been evacuated and the only around 50 Australian personnel were still in the area. These included the crews of four PBY Catalinas, a detachment from 11 Squadron which was based at Port Moresby. Japanese H6K bombers had been attacking Tulagi in small numbers since early 1942, rarely causing damage. A heavier raid on the 1st of May damaged one of the Catalinas, and they were all withdrawn to Port Moresby later that day. Over the next two days, coastwatchers reported an approaching convoy of ships, and the remaining Australian garrison was evacuated in small boats after destroying their remaining equipment.

The Tulagi Raid
RAdm Kiyohide Shima’s Tulagi invasion force, which consisted of several transports and minor warships covered by a pair of light cruisers and the seaplane tender Kamikawa Maru, duly arrived and took possession of the town, and began to establish a seaplane base. From here it was hoped that patrol planes could keep tabs on Allied convoys heading for Australia as well as the marauding US Navy carrier forces, which had been a constant thorn in the side of the Japanese. Shima would have been surprised to learn that the Americans were much closer than anyone in the Japanese high command realised.
The American signals intelligence units in Pearl Harbor and Australia had been listening in to Japanese signals, and were well aware that an operation to capture Port Moresby was under way. Admiral Nimitz had ordered RAdm Frank Fletcher, with the carriers Yorktown (Task Force 17) and Lexington (Task Force 11), to attack the Port Moresby invasion force and prevent it capturing the town. Lexington had briefly returned to Pearl Harbor for a hasty refit, during which time she had had her obsolete 8-inch gun turrets removed and had swapped the now-veteran VF-3 for her own squadron VF-2, which had completed its conversion to the F4F Wildcat. Lexington and her escorts were being refuelled when word of the Tulagi invasion was received, so Fletcher elected to dash north with the Yorktown to attack this exposed portion of the Japanese fleet.
Task Force 17 arrived at its launch position south of Guadalcanal on the 4th of May. Lacking enough fighters to both provide an escort for the strike and to protect the Yorktown, Fletcher chose to send his SBDs and TBDs in without support. He also ordered Yorktown Air Group’s commander, LtCdr Oscar Pederson, to remain aboard as a fighter direction officer rather than personally lead his men. The strike group was assembled on deck for a pre-dawn launch, which was completed without incident. The bombers flew across Guadalcanal and Sealark Channel and approach Florida Island and the village of Tulagi. Offshore several ships of the invasion force could be seen, some anchored and others underway.
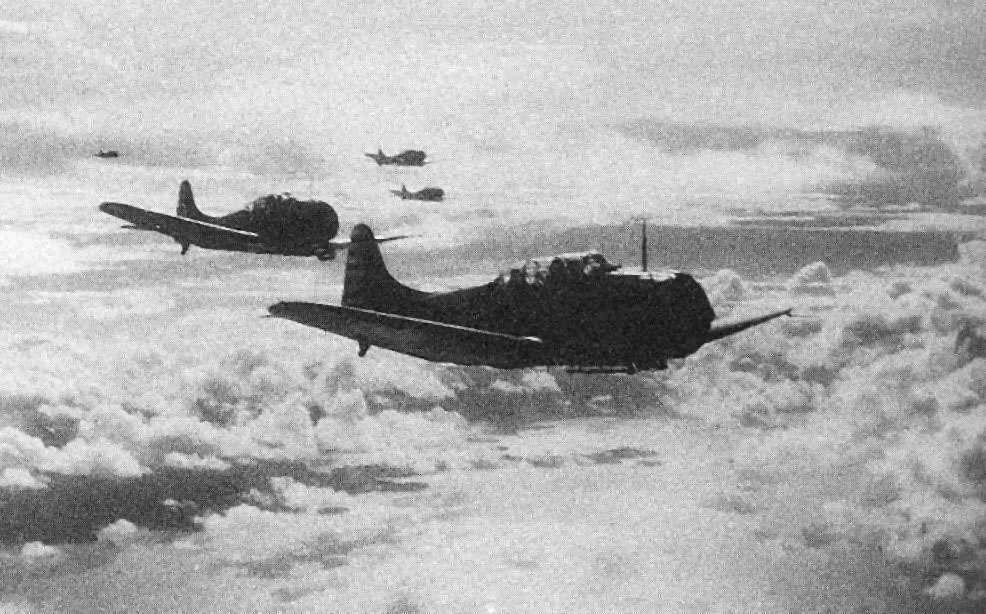
VS-5’s Dauntless bombers, led by LtCdr William O. Burch, had taken a slightly different route, sweeping to the west of Guadalcanal to check for ships still heading to the area from Rabaul. They rejoined the rest of the air group near Tulagi, and went in first – concentrating on largest ship, the minelayer Okinoshima with the destroyers Kikuzuki and Yuzuki moored alongside. During their dives the SBD pilots suffered when the cold air found at high altitude changed to warmer air near sea level, which caused condensation to form on the bomber’s telescopic bomb sights, causing them to fog up. VS-5 claimed 4 hits and a near miss, but in fact none of their bombs hit home due to the scope problem. A Japanese floatplane fighter thought about challenging the SBDs as they regrouped after the dive, but it was driven off by the squadron’s rear gunners.
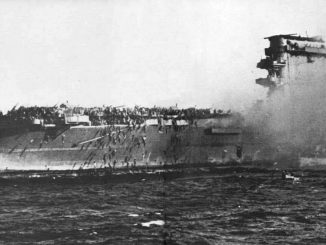
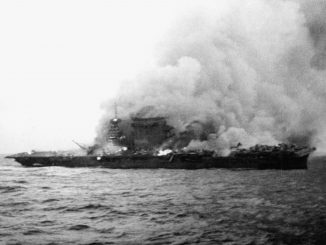
Next in were the 12 TBD Devastators of LtCdr Joe Taylor’s VT-5, carrying their heavy Mark 13 torpedoes. Three of the Devastators peeled off to attack the transport Azumasan Maru, but all three of their torpedoes ran too deep and passed underneath the ship, exploding on the beach beyond. The main group of seven TBDs headed for a ‘light cruiser’, which was actually the Kikuzuki. The destroyer had raised steam and started to move out of the harbour. One of the Devastators suffered a failure and could not drop its ‘fish’, but the remaining six released successfully. One hit was scored, which caused the vessel to settle slowly to the bottom. 12 men were killed and 22 injured, and the Kikuzuki would prove a total loss. The final two TBDs both attacked the auxiliary minelayer Koei Maru, and claimed to have hit her. However, the ship was not significantly damage.
Last to attack was LtCdr Wallace C. Short’s VB-5, with 15 SBDs. The first division of 5 singled out the minesweeper Tama Maru, but they suffered from the same bombsight fogging problems that had affected VS-5 – all of their bombs missed. the division did shoot up a floatplane that was attempting to get airborne, burning it on the water. The next two divisions both attacked the Okinoshima as she began to move away from the area, but the minelayer proved to be a slippery target throughout the attack and she escaped damage despite VB-5 claiming two hits.
All of the strike forced safely returned to the Yorktown to re-arm for a second strike. It was clear the first strike had achieved relatively little and there were still a number of profitable targets. Within an hour of their return to the Yorktown the three squadrons were back in the air, again without any fighter escort. The undamaged ships of the Tulagi invasion fleet were meanwhile attempting to leave the area, apart from the Kikuzuki which was beached to prevent her sinking.
VS-5 was again the first squadron in, picking as their target the Okinoshima, which was misidentified as a heavy cruiser. Thirteen SBDs dived into the attack, again suffering from fogging issues. Two hits and a near miss were claimed but the minelayer was manoeuvring at high speed and she again escaped damage. Her anti-aircraft fire was heavy and quite accurate, with two of the SBDs suffering damage. An F1M floatplane fighter intercepted one of the SBDs and damaged it, but was itself shot down after several Dauntlesses made passes at it. Taylor’s VT-5 was then called in to make another attempt on the Okinoshima. Eleven TBDs attempted an anvil attack, with divisions attacking the ship from two different directions, but again the minelayer escaped any hits. One of the Devastators became separated from the group on the return trip, and soon became lost.
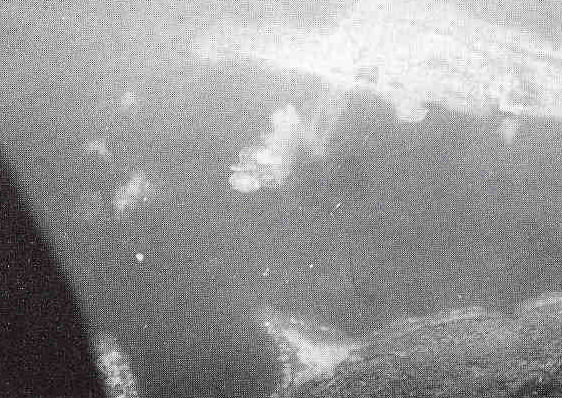
VB-5 had been ordered to search to the north-west of Tulagi for any ships that might be escaping, before swinging back towards the harbour. They discovered a trio of small vessels, the minesweepers Tama Maru, Wa 1 and Wa 2. Each division was assigned one of the boats, which were identified as ‘gunboats’, attacking with 1,000lb bombs. These weapons were overkill for such tiny craft, and as a result Wa 1 and Wa 2 were completely obliterated by direct hits. Tama Maru survived after being damaged by several near misses.
The strike group, less the lost VT-5 aircraft, returned with reports of inflicting more damage, but also complaining that Japanese aircraft had interfered. A third attack was organised, but this time fighter support would be supplied in the shape of four VF-42 Wildcats. The F4Fs arrived well in advance of the bombers, and spotted three more F1Ms that had been sent out from the seaplane tender Kamikawa Maru, anchored near Shortland Island. All three of the floatplanes were quickly shot down, and the fighters commenced a strafing attack on the destroyer Yuzuki and the minesweeper Tama Maru, which had already been worked over by VB-5. The Yuzuki escaped but the Tama Maru was forced to beach in a sinking condition.
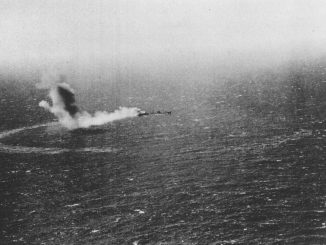
Due to the damage sustained by several SBDs, only 21 of the bombers were fit to take part in the third wave. The VS-5 contingent attacked the still stationary Azumasan Maru, but managed no hits, and then strafed a small sub-chaser until it sank. VB-5 followed an oil slick in the wake of the Yuzuki, and then spotted the still undamaged Okinoshima nearby. They again attacked this tempting target but the minelayer was clearly living charmed life, and she suffered only a pair of near misses. Okinoshima retired to Rabaul for minor repairs, but was sunk by the old submarine S-42 a few days later.
With that the attack concluded. All of the aircraft started back for the Yorktown as the weather began to close in. Two of the VF-42 Wildcats became separated, and lacking proper navigational notes due to being launched at very short notice they soon became lost. The pair came across the lost VT-5 Devastator, which was by this point running very low on fuel. The TBD headed for Guadalcanal to ditch offshore. The crew survived the landing, and made contact with an Australian coastwatcher. After a series of adventures they were safely returned to the Allied base in New Caledonia a month after the Tulagi raid. The lead F4F suffered a radio failure, and despite the fact that his wingman had acquired a homing signal from the Yorktown’s YE homing equipment both fighters likewise headed to Guadalcanal to land on the beach. Both were soon picked up by a destroyer specially detached from the task force for the job.
This ended the first phase of the battle of the Coral Sea. Despite the heavy attacks, damage to Japanese shipping was very light with only the Kikuzuki and the Tama Maru sunk, and several F1M floatplanes destroyed. In return one TBD and two F4Fs were lost, and several other aircraft suffered varying levels of damage. The performance of VT-5’s Mark 13 torpedoes was of particular concern, with just one hit scored from 22 drops. This was the first time that potential problems with this weapon revealed themselves, and it would be almost two years before the US Navy would solve them to the point that torpedo squadrons could have full confidence in the Mark 13. The fogging bombsights on the SBDs were another problem, but this phenomena was more clearly understood and could be mitigated by diving from lower altitudes. Later, SBDs received more advanced reflector-type bombsights that eliminated the problem entirely.
Yorktown headed south to re-join the Lexington Task Force, making the rendezvous the following day. Combat air patrol fighters from the Yorktown found and destroyed a H6K flying boat that was shadowing the Lexington, it becoming clear that the Japanese were aware that American carriers were in the Coral Sea. Indeed, Vice Admiral Takeo Takagi’s Carrier Striking Force, comprising the carriers Shokaku and Zuikaku and escorts, and tasked with supporting the Port Moresby operation, was north of the Solomon Islands when the Yorktown made its attack. Takagi set course for the Coral Sea with the intention of hunting down and destroying the American carriers.
Leave a Reply