

As part of Task Force 17, Admiral Frank J. Fletcher had been provided with a force of cruisers and destroyers from General MacArthur’s Australia-based naval contingent. These ships – the cruisers USS Chicago, HMAS Australia and HMAS Hobart and the destroyers USS Walke and Perkins, could be used independently as a surface force to counter the large number of Japanese cruisers that were participating in the MO operation. As dawn broke on the 7th of May, Fletcher decided to detach this force, designated Task Group 17.3 and with the destroyer Farragut also included, as a ‘Support Force’ to sit astride the likely route for the Japanese transports as they headed for Port Moresby.
TG17.3 was commanded by Rear Admiral John G. Crace, an Australian who actually outranked Fletcher but who had no experience commanding aircraft carriers. An agreement was in place that predominantly American naval forces would be commanded by a US Navy admiral, so Fletcher remained in overall command. Crace’s force was reasonably powerful but was completely lacking in air cover, and the Chicago’s CXAM radar would be forced to work overtime to provide adequate warning of incoming air raids.

Action off Misima
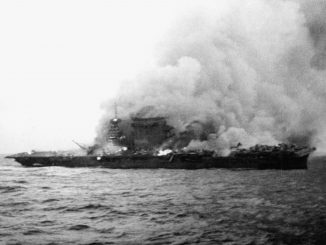
The six ships detached from Task Force 17 early on the morning of the 7th of May, and set course take position south of the Jomard Passage with orders to destroy any Japanese ships encountered. Within a few hours, at 0810, the Allied forces had been sighted, when Japanese E7K floatplanes from the cruisers Furutaka and Kinugasa flew close enough to report the presence of Fletcher’s carriers with a second force, presumably Crace’s, just a few miles away. By this point however the MO Striking Force under Admiral Chuichi Hara had already launched its mistaken attack on the oiler Neosho and the destroyer Sims, and for now Fletcher and Crace were safe from air attack. Fletcher used this grace period to find and sink the carrier Shoho.
Crace was making good progress, on schedule to arrive off Jomard by 2pm. He would not find targets, because the MO Invasion Force had been ordered to turn away whilst Hara cleared the way. Crace was aware of the air threat from Rabaul and from the seaplane bases in the Louisades, and arranged his ships in anti-aircraft formation. It was fortunate he did so, because the skies were soon filled with Japanese planes. Crace overheard transmissions from the Neosho that she was under attack, and from the Yorktown and Lexington fliers after they had sunk the Shoho, so he was kept abreast of developments in the vicinity. At 1240 a floatplane from the Kiyokawa Maru flying out of the temporary base at Deboyne sighted Crace’s force and reported a battleship, two cruisers and three destroyers. Shortly afterwards a land-based bomber also found the formation, but incorrectly reported that a carrier was present, causing Japanese commanders to believe that Fletcher was 150 miles closer to New Guinea than he actually was.
By the early afternoon TG17.3 was approaching its assigned position south of the Jomard Passage. Japanese land-based aircraft were out hunting for the American carriers. At 0915 twelve G4M bombers from the 4th Kokutai had taken off from Rabaul’s Vunakanau airfield, armed with Type 91 torpedoes and escorted by a dozen A6M Zeros. They flew to the last reported position of the American flattops but failed to find them, although they were detected by Task Force 17’s radars. The A6M escort was directed to return to base whilst the bombers continued searching. Also on the hunt were 20 G3Ms from the Genzan Kokutai that had been ordered to bomb Port Moresby, but were instead diverted to find the American ships.
On their way back to Rabaul, the Zeros detached form the 4th Ku attack group stumbled across TG17.3. These were detected on Chicago’s CXAM at 1417, before they closed to within visual range of the ships. A few volleys of anti-aircraft fire forced the Japanese, who were variously identified by the Allied warships as dive-bombers, fighters, or twin-engine bombers, to move away but not before they had reported the location of TG17.3 to the nearby torpedo planes. Half an hour later, the 4th Ku bombers were picked up on Chicago’s radar 75 miles out.
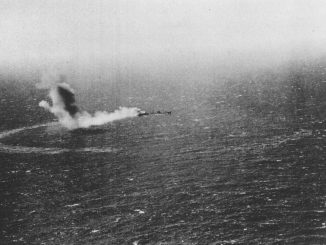
Torpedo Attack
These aircraft closed quickly, descending to low altitude to deliver their torpedoes. The attack was “most determined but fortunately badly delivered” – the G4Ms attacked the formation from ahead, splitting into several groups. Fortunately for the Allied ships, the fish were dropped at relatively long range, from 1,000 to 1,500 yards. Two torpedoes passed close to Australia but sharp handling by her skipper saw them miss. Three more torpedoes aimed at Chicago likewise missed. The Japanese bombers raked the ships with machine gun fire as they passed, but the anti-aircraft gunners put up a vigorous barrage in return and four of the G4Ms were shot down, with several more receiving lesser damage. Casualties among Crace’s force were light.

G4M bombers attacking Task Group 17.3
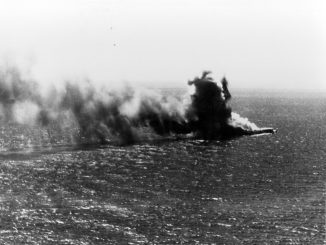
Shortly after the surviving 4th Ku bombers departed, the 20 G3Ms of the Genzan Ku arrived. They attack TG17.3 from astern, delivering a level-bombing attack from 18,000ft where anti-aircraft fire was much less effective. Australia, mistaken for a battleship, was again the focus of the attack, with a large pattern of bombs dropped all around her. The cruiser was straddled but suffered no damage other than a severe drenching from the spray of near misses and superficial shrapnel holes. Other bombs landed near Chicago, reportedly killing two of her crew, but otherwise they caused no damage.
Just after this attack a small formation of three bombers arrived and dropped a pattern of bombs close to the destroyer Perkins, without damaging her. Subsequently it was learned that these were actually American B-17s from the 40th Reconnaissance Squadron, operating from Townsville in Australia. B-17s had carried out several attacks on the MO Invasion Force transports without hitting anything, and their accuracy against TG17.3 was likewise poor. In fact Crace was driven to write in his action report that “their bombing, in comparison with that of the Japanese formation a few moments earlier, was disgraceful”. It would soon become evident that high-flying B-17s could rarely hit ships manoeuvring at sea.

HMAS Australia bracketed by bombs
Crace was so concerned about the repeated air attacks, and the lack of communication from Fletcher as to his position or intentions, that he decided to withdraw from the Jomard Passage and take up a position southeast of Port Moresby for the night. He radioed Fletcher that without air cover he was unable to remain on station, and would instead withdraw to the south for the evening. He was able to complete this move without any further harassment from the air. Fletcher was too busy, and too reliant on the safety of radio silence, to reply to Crace.
Meanwhile far to the east, Hara’s MO Striking Force was making ready to attack the American carrier force reported south of the Louisades. Hara had to wait an eternity for his aircraft to return from the attack on the Sims and Neosho, with the last group of D3A bombers not landing back aboard the Zuikaku until 1515. Realising that any strike group sent out at this hour would have to return after dark, Hara decided only to send his most experienced crews. First though he decided to send out eight B5N bombers to search 200 miles to the west, hoping that they would provide more accurate reports than the ones he had received so far during the day. Because these were due to return before dusk he could assign less experienced pilots, retaining his veterans for the strike which finally departed at 1615.
Night Mission
The strike was again led by LtCdr Kakuichi Takahashi, flying his second very long mission of the day. The American carriers were believed to be 330 miles distant, but with the MO Striking Force closing on Task Force 17 the distance would close to 200 miles by the time the bombers were due to return. No fighters accompanied the 12 D3As and 15 B5Ns, because they lacked the radio homing equipment which would be crucial for finding the Zuikaku and Shokaku on the return trip. They would be sorely missed on this flight.
Hara had yet again been misled by inaccurate reconnaissance reports. The ‘carriers’ he had sent Takahashi to destroy were, in fact, the ships of Crace’s Task Group 17.3. Fletcher’s carriers Yorktown and Lexington were actually much closer, in a position between Crace and Hara’s formations, in an ideal position to intercept the inbound bombers. Fletcher had been maintaining a constant combat air patrol during the day, and he had 12 Wildcats airborne when a contact was detected on Yorktown’s CXAM radar at 1747 – a group of low flying, fast moving aircraft, closing on the task force. 18 more Wildcats were quickly launched, with a total of 30 in position to defend the two carriers.
Visibility was becoming increasingly poor when the first section of F4Fs, under the command of VF-2 skipper LtCdr Paul Ramsay, made contact with the Japanese. They ripped into a group of nine B5Ns, and shot down four immediately and crippled a fifth which never made it back to base. Because of poor weather and the fading light, the bombers had closed their canopies and stowed their defensive machine guns, leaving them defenceless. One F4F was lost, probably in a collision with one of the Nakajimas, and the pilot was not recovered. Fifteen Japanese aviators were lost with their aircraft.
Another division of F4Fs under VF-42 executive officer LtCdr James Flatley came across another group of five B5Ns, and initially misidentified them as friendlies before one element of two fighters realised their mistake and engaged them. Another B5N was shot down, before the two pilots separated to give chase and eventually claimed another, with a third torpedo bomber badly damaged and later forced to ditch. One of the two American pilots was never heard from again, possibly becoming lost in the dark with a malfunctioning radio. Flatley was meanwhile leading the rest of his division in an attack on a D3A, which was soon destroyed.
Having lost a third of his attack force, Takahashi and the torpedo leader LtCdr Shihekazu Shimazaki elected to call off the attack and return to base. They ditched their bombs and torpedoes and tuned in to the homing frequency transmitted by the MO Striking Force. Unfortunately for the Japanese this was very close to the frequency that the American fighter directors used for transmissions, which would cause no end of trouble. The light was fading fast, and the Americans struggled to recover their fighters, which had by this point abandoned the interception attempt, in the dark. As confusion began to set in, Japanese carrier bombers finally sighted the American carriers and sent out an accurate contact report – but they had no weapons with which to attack.
One Yorktown pilot waiting to land saw an aircraft signalling with a lamp – that was not American procedure! He fired a quick burst which caused three D3As to scatter in panic, before returning to the landing circle. Several of the destroyers of Task Force 17 caught sight of unidentified aircraft, and soon began to open fire and any suspicious target. Several Wildcat pilots were forced to scatter and abandon their landing attempts, one of whom subsequently became lost, and was never found again. The others eventually made it back aboard ship, several sporting holes from the fire thrown up by the American escort ships.
The Japanese eventually managed to find their way back home, with Hara taking the special precaution of lighting his ships and deploying them into a special formation. 18 aircraft eventually returned safely, many of the aviators exhausted after flying two long, stressful missions in the same day. They reported that their homing gear had not functioned correctly, perhaps having been misled or jammed by the radio signals from the American carriers.
Both commanders now realised that the enemy carriers lay very close, and it was inevitable that there would be an encounter the following day. Fletcher’s radio men had detected the Japanese homing transmissions and had a reasonably accurate position for Hara’s carriers, and Hara himself finally had an accurate report of Fletcher’s position. Both forces would continue manoeuvring during the night, but they fully expected to re-acquire contact and launch strikes early on the morning of the 8th of May. The Battle of the Coral Sea was about to come to a climax.
Leave a Reply