

The second force involved in the Japanese attack on Ceylon was Vice Admiral Jisaburo Ozawa’s Malay Force, centred on the light carrier Ryujo. This vessel had provided close support for the attacks on Palembang and Java, before covering Japanese operations on northern Sumatra, the Andamans, and Burma. On the 1st of April, the Ryujo departed from Mergui in Burma to head for the Bay of Bengal, along with a force of five heavy cruisers, a light cruiser and four destroyers. Her mission was to disrupt British sea lanes and prevent supplies reaching the beleaguered troops in Burma, who were even then withdrawing towards the Indian border.
Supporting the sweep into the bay were the H6K flying boats of the Toko Kokutai, which were based at Port Blair in the recently captured Andaman Islands. The 22nd Air Flotilla had also moved some of its units forward – the flotilla’s Zero equipped fighter unit moved to Mingaladon airfield outside Rangoon where it was joined by the Genzan Kokutai with 18 G3Ms. These aircraft conducted reconnaissance missions across Ozawa’s path, and made several attacks on Allied shipping, erroneously claiming to have sunk several vessels.
The British had ordered that the ports of Calcutta and Madras be cleared, and during the first days of April dozens of ships set out to leave the area. Some of these were molested by the Japanese bombers, but damage was relatively light. One ship, the Glenshiel, was sunk by the submarine I-7 which was supporting the Indian Ocean operation. In response to these mvoements the British stepped up their search efforts, with Hudsons flying regular patrols from Akyab. Reserve units also flew coastal patrols, some of them by flights equipped with 1920s era Westland Wapiti biplanes.
On the 5th of April, as Nagumo’s force was busy raiding Ceylon itself, Ozawa’s fleet began its own attack. Aircraft from the Ryujo and each of the cruisers ranged ahead to seek out any Allied shipping. In the afternoon a 10-ship convoy was spotted heading south, just off the port town of Vizagapatam, and B5Ns from the carrier attacked with bombs. They scored one hit on the liner Dardanus in her engine room, which brought the ship to a stop. As the vessel was being abandoned, another pair of B5Ns arrived and managed a second hit. However, the ship was not in danger of sinking and the captain soon requested a tow from another liner, the Gandara. Another vessel, a cargo ship named Harpasa, was also spotted and sunk by a pair of Ryujo bombers.

Indian Ocean Raid, 5th-9th April 1942
Late in the day Ozawa split his force into three groups, in order to search a greater area for enemy ships. A Northern Group, with the cruisers Kumano and Suzuya and the destroyer Shirakumo, a Central Group with the Ryujo, cruisers Chokai and Yura and destroyers Yugiri and Asagiri, and a Southern Group with the cruisers Mogami and Mikuma plus the destroyer Amagiri comprised the force. As dawn broke on the 6th of April, these forces were in position to ravage Allied shipping lanes off the Indian coast.
Ozawa’s Sweep
The Northern Group came across the Norwegian tanker Elsa and shelled her, which caused the panicked crew to take to the lifeboats as their ship burned and later sank. Not long afterwards a report came in from a Toko H6K that it had spotted a convoy. This sighting was then confirmed when an E8N floatplane from the Kumano came across the same unescorted convoy of 6 ships. A raider warning message was sent out by the convoy commodore, who then ordered the convoy to scatter. This proved to be in vain, as the Japanese chased down and sank all of the ships one by one – the Malda, Autolycus, Indora, Exmoor, Silksworth, and Shinkuang were all lost. The only damage sustained by the Northern Force occurred when an RAF Mohawk fighter from number 5 Squadron, on patrol over the ocean, spotted Kumano’s E8N landing on the water and strafed it, causing minor damage.
The Centre Group operated off Vizagapatam, where they were spotted by one of the ancient Wapitis from number 6 Coastal Defence Flight. A convoy of 13 ships was passing through the area, but a number had lost contact and vessels were scattered along the coast. Two Dutch ships, the Banjoewangi and Batavia, and the British Taksang were all sunk by the Yura and Yugiri. It is possible that the Ryujo herself was also involved in this action, firing her deck guns in one of the very few surface actions involving an aircraft carrier. Ryujo planes, as well as a seaplane from Chokai, found the freighter Ganges, and it was soon sunk by the cruiser, as were the American Bienville and the British Sinkiang soon afterwards. Two other ships, the Selma City and Van der Capellan, with both sunk by bombs dropped by Ryujo B5Ns.
Ryujo aircraft also found the time to launch a series of attacks on Vizagapatam and nearby Cocanada, which were the very first attacks on Indian soil. Five B5Ns bombed Vizagapatam in the late morning and again in the afternoon, causing limited damage and killing a few civilians but causing damage to only one of the ships that remaining in the port. A single raid on Cocanada resulted in no appreciable damage to any of the Allied ships that were sheltering there. However, both towns were evacuated in panic as the population expected the Japanese to land troops to occupy India, and it was several days before the emergency subsided and the civilians could be persuaded to return.
Floatplanes from the Mogami and Mikuma in the Southern Group came across the damaged Dardanus, still being towed by the Gandara. They dropped bombs which missed the ships, before the cruisers arrived to shell the liners. Burning badly, both were finished of by torpedoes from the Amagiri. The group then found two Norwegian ships, the Dagfred and Hermod. Both of the crews were ordered off their vessels before they were shelled and sunk, but crewmen from the Dagfred were subject to a strafing attack by the cruiser’s floatplanes. Still, all of the crews survived to be picked up by friendly ships.
Ozawa’s cruise into the Bay of Bengal had claimed a total of twenty ships sunk, for a combined tonnage of around 100,000 tons. Genzan G3Ms added to this tally when they found and sank the sloop HMIS Indus off Akyab the same day. The attack caused chaos in Allied convoy commands, with the port of Calcutta practically shutting down – it was three weeks before shipping schedules could be resumed on something approaching a normal basis. None of the Japanese ships, with began their withdrawal on the 7th, had suffered the slightest damage.
The Tricomalee Raid
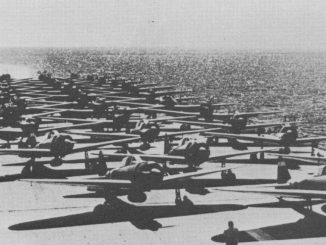
Whilst Ozawa was sweeping the Bay of Bengal, Nagumo’s force of five carriers was working its way back towards Ceylon. After the 5th April raids, the Kido Butai had manoeuvred south of Ceylon, with the intention of arriving in position to launch further attacks on the British base at Trincomalee, on the east coast of the island. On the morning of the 9th of April Nagumo re-appeared, when his ships were spotted by another 413 Squadron Catalina – this was shot down, but not before it transmitted a partial sighting report that served to warn the British. The Japanese began to launch their aircraft at 0600, 91 B5N bombers escorted by 38 Zeros.

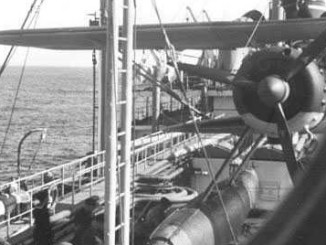
B5N bombers return from the Trincomalee raid
Trincomalee had a working radar set and this provided early warning of the impending raid. A trio of 261 Squadron Hurricanes, on dawn patrol, were vectored out to sea to intercept the Japanese. They managed to work themselves into a position behind the escorting Zero fighters, and attacked out of a cloud. Three Japanese fighters were quickly shot down, but one Hurricane was lost and another had to crash land. Other 261 Squadron Hurricanes arrived as the Japanese began their bombing runs against China Bay airfield, and they attacked the B5Ns. However, the Zeros quickly got the measure of the British and the Hurricanes were roughly handled, with about half of those getting airfield being shot down.
The Japanese fighters also dropped to low level to carry out their usual strafing runs, adding to the destruction. The hangar housing 273 Squadron’s old Vildebeests was hit and all of the aircraft inside were damaged beyond repair. Also claimed destroyed were several oil tanks, and several ships in Trincomalee harbour received damage. Bombers hit the freighter Sagaing and set her on fire, forcing the crew to beach their ship to prevent her sinking. The monitor Erebus, attached to the Eastern Fleet, was also hit by several bombs which resulted in some casualties.
The Loss of the Hermes
Meanwhile Japanese reconnaissance aircraft were scouring the coastal waters of Ceylon, looking for Allie shipping. A floatplane from the battleship Haruna came across a prime target, reporting the presence of an aircraft carrier and three destroyers just south of Trincomalee, off the town of Batticaloa. This was the carrier Hermes, which had been ordered to evacuate the port the day prior, but was now making her way back. Nagumo had kept his dive bombers as a reserve for precisely this situation, and 85 D3As were soon launched and sent after this new target with an escort of nine Zeros.
The D3As, led by LtCdr Kakuicho Takahashi, swept in to the attack. Hermes had sent her only squadron ashore and was completely defenceless, although half a dozen Fulmars from 273 Squadron arrived whilst the attack was underway. The Japanese pressed home their attacks to a very low level, with the first wave of 32 D3As scoring countless hits which killed Hermes’ captain, and mortally wounded the ship. The old carrier sank beneath the waves within 20 minutes, taking over 300 of her crew. HMAS Vampire, the carrier’s sole escort, was also bombed by 16 D3As, taking an estimated 13 hits, she and went down soon after the Hermes. This represented the first time in history that an aircraft carrier had been sunk by air attack.
Some of the bombers spotted other ships further north, and delivered another withering attack which claimed the auxiliary tanker Athelstane and her escort, the corvette HMS Hollyhock. The attack had been so swift and so successful that the bombers from Soryu, arriving last, had no targets left to attack and began a search further north. They soon came across the tanker British Sergeant and the freighter Norviken, both of which were sunk in short order. Fulmars from 803 and 806 Squadrons were searching for the Japanese and they intercepted some of the bombers, claiming three shot down in exchange for two of their fighters lost to Zeros.

HMS Hermes sinking
The sole attempt by the British to fight back was conducted by 11 Squadron, which sent out a group of Blenheims to bomb the Japanese carriers. These found Nagumo’s force without being detected, in part because the Japanese carriers all lacked radar sets. However, their bombing results were poor, with the bombs landing near the carrier Akagi and the cruiser Tone but causing no damage at all. Zeros on combat air patrol then thoroughly mauled the bombers, shooting down four out of the nine in the British formation. Another Blenheim was lost when the survivors stumbled into the aircraft returning from the attack on the Hermes, and a final Blenheim was lost when it cracked up on landing, although the crew survived unhurt.
Soon afterwards the Japanese completed the recovery of their aircraft, and Nagumo set course for the Indies, and then Japan. His ships had achieved much over the preceding months, but many were overdue for a refit. The Indian Ocean raid had been a success, but a limited one. Over 150,000 tons of Allied shipping had been sunk with a submarine sweep adding a few more ships, but the most powerful units of the Eastern Fleet had survived. The RAF and Fleet Air Arm units on Ceylon had taken a battering, but replacements were consistently making their way into the theatre and the losses were made good in a few weeks. Aside from minor incursions by surface raiders and submarines, the Japanese would never again make a serious effort to attack the Allies in the Indian Ocean.
Leave a Reply