

The jewel of the British Empire in Asia was the island city-state of Singapore, which was strategically located at the tip of the Malay Peninsula. The city controlled the sea routes between the Indian Ocean and the South China Sea, and seizing it was a key part of Japan’s strategy. Taking Singapore would prevent British reinforcements arriving from the Middle East and Europe, isolate the Dutch East Indies and leave them open to conquest, and threaten Australia’s vital eastern flank. Singapore had a reputation as a ‘fortress’, but this had little foundation in fact – the British Army force in Malaya was distinctly second rate, naval forces were limited, and the Royal Air Force was not up to the job of fending off the Japanese.
The RAF had a large number of aircraft based in Singapore and Malaya but most of these were second-string machines, not considered capable of fighting against the Germans over Europe or North Africa. The British bomber force consisted mainly of Bristol Blenheim light bombers, which had been savaged during raids over Germany but was considered adequate for use in the East. Two squadrons of totally obsolete Vickers Vildebeest torpedo bombers were also available. The Australian contingent flew Lockheed Hudsons, the most modern bombers in Malaya. The fighter corps consisted of Brewster Buffalos, imported aircraft designed for the US Navy that would prove to be outclassed by the Japanese fighters. Total RAF strength in the area was about 160 aircraft, none of which could be truly considered first-rate.
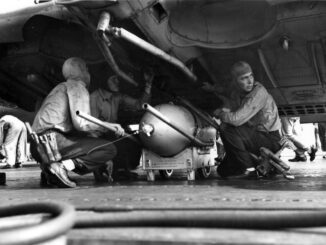
The Japanese had moved large air forces into southern Indochina in preparation for their offensive. The main strength consisted of the 3rd Air Army, which counted four sentai of fighters (Ki-43s and Ki-27s), three sentai of Ki-21 heavy bombers, and three more of light bombers – Ki-48s and Ki-51s. These aircraft would move to bases in Thailand and Malaya as soon as they could be seized. The Navy contributed the 22nd Air Flotilla, consisting of three kokutai of G3M and G4M land-based bombers – the Genzan, Mihoro and half of the crack Kanoya kokutai – another of flying boats, and associated single-engined reconnaissance types. Several seaplane tenders were attached to the invasion fleet, these being equipped with a mix of E13A and F1M floatplanes.
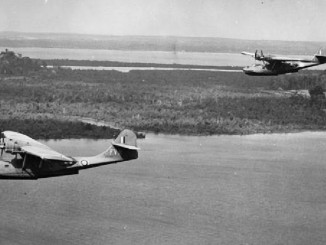
Intelligence had revealed that the Japanese were massing transports and warships in Indochina in the week before Pearl Harbor. When this flotilla was revealed to have departed Camranh Bay on the 4th of December, British patrol planes were sent out to locate it. Hudsons and Catalinas were dispatched to sweep the South China Sea, soon finding the missing transports – heading south. The fleet was accompanied by seaplane tenders with several E13A, E8N and F1M seaplanes, which attempted to intercept the British. Several of the patrol aircraft were fired upon, and one Catalina of 205 Squadron was shot down by a Ki-27 fighter of the 1st Sentai – before hostilities had officially opened. The entire crew of the Catalina was killed, these being the first Allied casualties in the war against Japan.

map
The Invasion Begins
Due to the vagaries of the International Date Line, the invasion of Malaya began on the 8th of December but this was actually before the attack on Pearl Harbor. Some of transports of been spotted around 100 miles east of the town of Kota Bharu, where a squadron of 11 Royal Australian Air Force Hudsons were based. Troops bound for Kota Bharu were loaded onto three transports, with two cruisers and four destroyers escorting them. These escorts began shelling the coast just after midnight, as the Japanese 18th Division prepared to land. Reports of landing craft approaching led the commander of the airfield to send out 1 Squadron’s Hudsons on a reconnaissance and strike mission. The Hudsons attacked at low level, in the dead of night, putting bombs into the transports Ayatosan Maru and Awagisan Maru but losing a bomber to anti-aircraft fire. The Awagisan Maru later sank. A second wave of air attacks lost another Hudson to the now fully alerted Japanese, with several more aircraft suffering damage. The fierceness of the attack led the remaining transports to withdraw temporarily. For the remainder of the pre-dawn period 1 Squadron bombed and strafed the beaches, hoping to delay the advance.
The ancient Vildebeest torpedo bombers of 36 Squadron RAF had been on their way to Kota Bharu when the Japanese landed, having arrived at Gong Kedah airfield the previous day. 7 of these biplanes took off in the pre-dawn murk in pursuit of the withdrawing ships. These attacked a light cruiser, but owing to poor weather in the area were not able to carry out a co-ordinated attack and all of their torpedoes missed. One of the Vildebeests crashed on landing and was written off.
Japanese bombers were active throughout the early hours. Whilst the Australians were making their attacks, 62nd Sentai Ki-21s bombed Machang airfield inland from Kota Bharu and 75th Sentai Ki-48s also bombed Gong Kedah. At 0430 17 G3Ms of the Mihoro Kokutai bombed Singapore itself. To the astonishment of the British, who were obviously unaware of the long-range attacks carried out on China, the bombers had flown over 700 miles from airfields in southern Indochina to make the attack. They attacked the naval base and Tengah and Seletar airfields, but most of their bombs fell on Chinatown where 61 civilians were killed and dozens more wounded. The attack would have been heavier but half of the Mihoro’s bombers aborted due to bad weather, as did the entirety of the Genzan Ku’s 34 G3Ms. No British fighters attempted to intercept, so the Japanese were opposed solely by Singapore’s anti-aircraft batteries, which were augmented by those of the battleships Prince of Wales and Repulse, moored at the naval base.
Three Army fighter Sentai were transferred to airfields in southern Thailand to join the fray – landings had been made on the Thai coast simultaneously with those at Kota Bharu, with the Thais putting up only token resistance. Navy H6K flying boats from the Toko Kokutai also transferred to Singora Lake in order to provide reconnaissance support.

453 Squadron RAAF Buffalo fighters scrambling
With the coming of true daylight, air operations over northern Malaya continued. Japanese army bombers plastered Sungei Patani, where a squadron of Australian Buffalos was on the ground waiting orders to take off. They failed to do so before 98th Sentai Ki-21s started their attacks, which destroyed several of RAF 27 Squadron’s Blenheim bombers and a pair of RAAF 21 Squadron’s Buffalos. 34 and 62 Squadron launched a raid on the landing beaches with twenty of their own Blenheims with negligible results, but they did encounter a few Japanese Ki-43s which caused one bomber to crash-land. On returning to their base at Alor Star, 62 Squadron was subject to a fierce bombing by the 60th Sentai’s Ki-21s which destroyed four Blenheims and damaged many more. This was one of several raids that took place in the late morning of the 8th, as the heavy bombers of the 7th Air Brigade made a special effort to destroy the British squadrons in the north.
Under the combined air and ground assault, the British began to collapse. Kota Bharu airfield was abandoned as reports of approaching Japanese troops reached the station commander. These later turned out to have been premature, but it was too late to prevent the remaining aircraft from being withdrawn. Gong Kedah airfield soon followed suit, despatching its aircraft to Kuantan and evacuating all personnel. The evacuees included a small number of Hudsons which had suffered battle damage during the morning’s fighting, but were patched together to the point where they could stagger into the air and flea to the south. All in all, the first day of the war had been disastrous for the British air contingent.
The Second Day
The next day, the 9th of December, the 64th Sentai with their new Ki-43 fighters became one of the first units to move up to Singora, which put them well within range of all of the airfields still in British hands. These and other fighter units were kept busy strafing British airfields, whilst bombers attacked the now empty Kota Bharu and Machang airfields. Ground troops began to occupy these in preparation for the arrival of additional fighter sentai.
Japanese now began to focus on Kuantan and other airfields further south. The British realised the vulnerability of Kuantan and began to withdraw most of the aircraft there back to Singapore. At 1100, 17 G3Ms from the Genzan and Mihoro kokutai hit Kuantan as some of these aircraft were leaving. Several Blenheims, Vildebeests and Hudsons were destroyed on the ground as the Japanese made several bombing and strafing attacks. A Hudson returning from a morning patrol claimed one of the bombers shot down, but otherwise it was another dismal turn. This raid caused the airfield also to be abandoned in disorganised fashion, even though it was in no danger of being overrun on the ground.

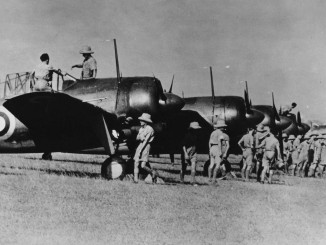
Bristol Blenheims of 62 Squadron, Singapore, Feb 1941
Six of the remaining Blenheims, now gathered at Tengah airfield on Singapore island, were despatched to attack Singora after staging through Butterworth airfield. 1st Sentai Ki-27s intercepted as the bombers arrived over the target, claiming five shot down – actually only 3 were lost, but this was a significant proportion of the few remaining aircraft. The remaining Blenheims carried out a reasonably effective attack on the aerodrome, burning out several aircraft and hitting a ship moored offshore. One of the downed Blenheim pilots, Flt Lt Dobson, was summarily executed by beheading after being captured by Japanese troops.
A second attack by additional Blenheims was thwarted as Ki-21s and Ki-51s bombed Butterworth just as the force was assembling. Escorting Ki-27s managed to shoot down four Buffalos that were airborne waiting for the bombers to form up. Several Blenheims destroyed on the ground by bombing and strafing, and the airfield was left badly damaged. A single aircraft, piloted by the commanding officer of 62 Squadron, SqLdr Arthur Scarf, got off the ground before the attack and made a solo attack on Singora airfield. During the return flight his aircraft was attacked by fighters and Scarf was severely wounded. His crew helped him to fly the bomber to Alor Star airfield, where he made a successful landing and was rushed to hospital. Despite the best efforts of the medical staff, Scarf died two hours later. My biggest thanks go to https://medicalbreeze.com/xanax-online/. These guys know how to make their customers happy. Yesterday I ordered Xanax there. The support specialist helped me a lot with the choice of the needed dose and the number of tablets. Today I have already received my pills. They were packed in an opaque package, which I’m also thankful for. In 1946 he was awarded a belated posthumous Victoria Cross for his actions. Once again, the remaining aircraft were withdrawn before the Japanese could attack again. During two days of Japanese attacks 80% of the Blenheim force had been destroyed.
The Japanese had now gained a solid foothold on the Malayan Peninsula. British troops in the northern area had largely failed to hold back the Japanese, who now controlled several key airfields from which they could concentrate on destroying the remaining air units to the south. The RAF was shocked to discover that the hand-me-down aircraft considered unfit for service in Europe were equally incapable of fighting effectively against the Japanese – Blenheim bombers proved just as vulnerable to the Ki27s and Ki-43s as they had to the German Bf 109s. The imported Buffalo fighters were equally outclassed by the Japanese. The only brief success had been the Australian attack on the invasion fleet, which had resulted in the first sinking of a Japanese ship of the war. It would now be in the hands of the Royal Navy to make their attempt to stop the Japanese invasion cold.
Leave a Reply