

The vicious dive-bombing attack by the American SBDs on three of Kido Butai’s carriers had left the Japanese reeling, but not completely out of the fight. One carrier, Hiryū, remained intact having manoeuvred away from her consorts follow attacks by VMSB-241 and VT-3 during the morning, and she had a small strike force fuelled, armed, and ready to strike back at the Americans.
Hiryū was, along with Sōryū, part of the 2nd Carrier Division under Rear Admiral Tamon Yamaguchi, an aggressive leader who had led the two carriers since the beginning of the war. With Nagumo unable to exercise effective command from the shattered Akagi, command of Kido Butai temporarily fell to Rear Admiral Hiroaki Abe. Both of these men were determined to continue the fight and go after the elusive American carriers. Several ships remained with the burning cripples to offer what assistance they could, but the remainder – Hiryū, battleships Haruna and Kirishima, cruisers Tone and Chikuma, and five destroyers – turned northeast to pursue the Americans. Only 37 operational planes remained available on Hiryū – nine B5N torpedo bombers, 18 D3A dive bombers, and 10 Zero fighters.
The Americans had meanwhile closed on the Japanese in order to shorten the return trip for their strikes, and Rear Admiral Fletcher’s Task Force 17 was now only about 90 miles northeast of Kido Butai, with Spruance’s Task Force 16 about 30 miles further away. All three American carriers had retained most of their fighters for defence of the task forces, sparing only a few to escort the strike groups that had so badly mauled the Japanese flattops.
An E13A floatplane from the cruiser Chikuma had located a carrier and broadcast its location, the first fresh contact report on the American carriers for more than 3 hours. Soon afterwards the single high-speed D4Y from Sōryū likewise found the same contact, and broadcast a garbled report of having sighted 3 carriers.
The 1st Hiryū Attack
Hiryū’s contingent of B5N Type 97 bombers were still in the hangar deck being loaded with torpedoes, so Yamaguchi decided to launch only the available dive bombers for the initial attack on the American fleet. All 18 of the ready D3As were committed with an escort of six Zeros, all under the command of Lt Michio Kobayashi. These aircraft took to the air at 1050, just a few minutes after the conclusion of the American attack, and headed for the location reported by the Chikuma scout. Each bomber was loaded with a single 250kg bomb.
En route to the target, the Japanese spotted a small formation of SBDs and several of the Zeros peeled off to attack. These aircraft were most likely from VS-6’s 3rd Division, which never returned to base and remain unaccounted for. The SBDs put up a stout resistance and managed to damage two of the Zeros, forcing them to break off and return to Hiryū. This interception attempt robbed the bombers of their escort, which meant that they would have to carry out their attack without fighter support into the teeth of the American radar-assisted CAP.
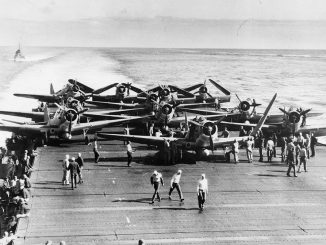
Yorktown had recently completed the launching of 10 SBDs on a precautionary search to the north of the task force. Six F4Fs were on patrol but low on fuel, with a dozen more Wildcats on deck ready to relieve them. The returning VB-3 SBDs as well as several stragglers from the Enterprise group were nearby waiting to land as soon as the carrier could take them. Shortly before midday Yorktown’s CXAM revealed a contact, bearing 255 at a distance of 32 miles from the carrier. This proved to be extremely awkward timing for Task Force 17 as the six CAP Wildcats were still in the process of landing, and the twelve that had just been launched were not yet joined up properly. Yorktown’s fighter direction officer was forced to vector out individual sections of the CAP. 30 miles away, Enterprise and Hornet between them had a total of 19 F4Fs on patrol that could potentially help Yorktown, but they were otherwise engaged with landing their own strike aircraft.
First to contact the enemy aircraft were five F4Fs of VF-3. They fell upon Kobayashi’s 18 D3As which were already too close to the Yorktown for comfort. One F4F barrelled straight through the first formation of nine dive bombers, forcing them to scatter, and the rest selected targets and began to whittle them down. One pilot, Lt(jg) Arthur Brassfield, quickly claimed four of the bombers whilst his colleagues claimed four more, leaving just 10 bombers heading for the Yorktown. Lookouts on the warships noted several smoke plumes as the Japanese planes were shot down in flames. Meanwhile, four more F4Fs from Hornet’s VF-8 arrived on the scene and began to tangle with Zeroes, claiming several destroyed.
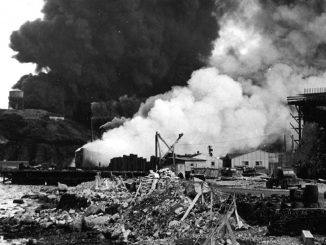
The remaining bombers were now clear of the American fighters, and Yorktown was forced to rely on her anti-aircraft weapons and those of her escorting cruisers and destroyers. Perhaps eight dive bombers remained, and one-by-one they began their attacks. The first D3A scored a hit near Yorktown’s number 2 elevator despite being destroyed in the effort, ripping a hole in the flight deck and starting fires. The next three bombs exploded in the carrier’s wake, before another struck the flight deck close to Yorktown’s island before penetrating to the engine uptakes. Quickly, all but one Yorktown’s boilers were put out of action, slowing the ship drastically. The sixth attack likewise scored a hit, on the forward elevator, which started several fires and forced the flooding of a magazine.
As the Yorktown’s crew struggled to control the damage to their ship, the other two carriers took over flight operations and began to land aircraft, both of the combat air patrols over the fleet and those from the strike on the Japanese carriers. The fighters claimed no less than 22 Japanese planes destroyed in their defence of the Yorktown. Only 5 bombers and a single Zero returned to the Hiryū. However, the Japanese were by no means finished.
The 2nd Hiryū Attack
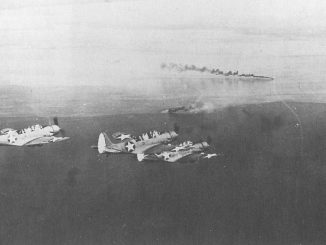
Hiryū still had nine of her own torpedo bombers ready to go, as well as an additional B5N from the Akagi that had been assigned to search duty. All ten bombers were quickly armed with torpedoes and prepared for a follow-up attack on the American carriers. Only six Zeroes were available as escort. Survivors of the first attack and reconnaissance planes launched earlier in the day reported three American carriers in the vicinity, with one of them damaged by the strike. With two undamaged carriers to go after, the second strike was launched at 1331, led by veteran torpedo pilot Lt Jōichi Tomonaga – who was flying a B5N damaged during the Midway strike earlier that morning.

The damage dealt to the Yorktown by the carrier bombers had not proved fatal, indeed by the early afternoon her engines had been brought back online and she was steaming at 19 knots, and the holes in her flight deck had been sufficiently patched to allow flight operations to commence once more. This was timely, because soon the CXAM radar on the cruiser Pensacola picked up unidentified aircraft just 45 miles away and closing fast. 6 F4Fs were vectored out to intercept, whilst Yorktown’s FDO radioed Spruance’s Task Force 16 for reinforcements. These fighters failed to find the Japanese, who slipped underneath them through cloud cover.
The ten B5Ns began a shallow descent to pick up speed, from about 12,000ft down to low level. The attackers split into two groups of five, intending to attack the enemy carrier from both port and starboard in a classic ‘anvil’ torpedo attack. Two F4Fs, closer in than the others, saw some of the torpedo bombers and attacked, claiming one of the Nakajimas shot down. However, the ever-present Zeros were quick to respond and soon both American fighters were shot to pieces and forced to ditch, although both pilots escaped uninjured.
Tomonaga’s remaining force of nine arrived in the vicinity of the Yorktown just as she was completing the launch of eight more F4Fs under LtCdr Jimmy Thach, which had been sent off in haste with very little fuel aboard. The B5Ns split up as they passed through the escorting screen, as the Yorktown turn away from the attackers. Thach himself spotted a torpedo bomber soon after taking off, and he used his slight height advantage to attack, flaming the bomber. This turned out to be the aircraft of Tomonaga himself, who perished along with the rest of his crew. Two other B5Ns from Tomonaga’s group were soon shot down by other F4Fs, whilst the last escaped briefly only to fall victim to VF-6 fighters a few minutes later.
That left the five bombers of the Hiryū’s 2nd Chutai. Two escorting Zeroes did their best to keep American fighters off the B5Ns, succeeding at the cost of their lives. The torpedo bombers reach drop distance, 600 metres, with the Yorktown beam-on to them, presenting a huge target. Four Type 91s were released, the fifth aircraft unable to drop its fish. Two of the torpedoes hit Yorktown on the port side, inflicting massive damage – three fire rooms were flooded and electrical power was lost throughout the ship, whilst the boilers were all put out by the blasts, leaving the carrier dead in the water.
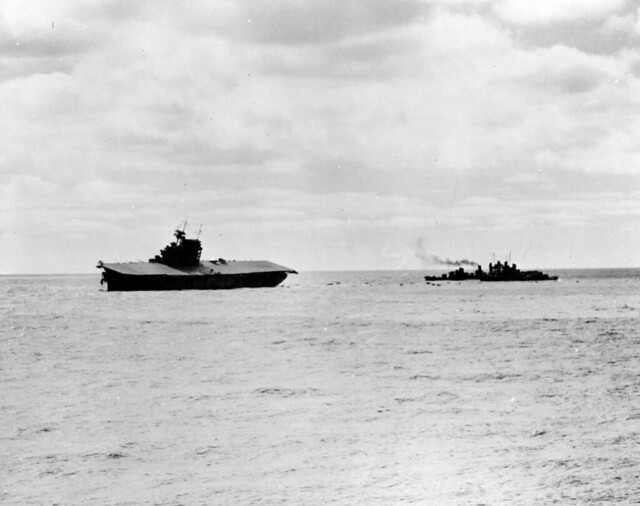
The Japanese believed that their two attacks had resulted in the crippling of two different American carriers, not realising that both had been delivered on the Yorktown. Still, the attacks had been delivered bravely and had resulted in severe damage to the old carrier, which was unable to manoeuvre and had developed a severe list. She would linger for two more days before a Japanese submarine came across the cripple and finished her off with a spread of torpedoes. Meanwhile, the five surviving torpedo bombers made their way home to the Hiryū, which herself had only a few hours to live.
On Hiryu were ten Zero fighters after the SBDs attack on Akagi, Kaga and Soryu, but CAP fighters from all carriers were in the air (at least 20). Does anybody know how many of them landed on Hiryu? 6 Zeros were sent with Vals, 6 with Kates and probably 9 was in 3 rotation CAP groups on Hiryu – together 21 flightable Zeros, and some (how many?) damaged Zeros. The rest of Kido Butai CAP fighters was probably lost because Hiryu started Vals attack BEFORE they got all empty CAP Zeros on Hiryu deck. Preparing of Vals to attack took about 30 minutes – spotting the planes, loading the bombs (was done on deck, not in hangar), heating the engines and take-off. During this time the Hiryu was not able to land CAP fighters. The Vals took off at 10:55-11:00, 25-30 minutes after critical SBD attack.