

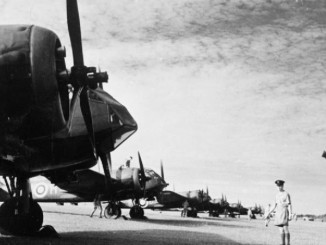
As the British consolidated their air forces on the airfields of Singapore, they took stock of their remaining planes. The fighters of 243 Squadron and 488 (RNZAF) Squadron were in reasonable shape, having been spared involvement in the debacles following the opening of hostilities. They were joined by the remnants of 21 and 453 Squadrons, RAAF, now combined into a single unit with Brewster Buffalos. Nine 2-VLG-V Buffalos were also in Singapore, having been loaned to Far East Command by the Dutch. In total, Singapore possessed 54 Buffalo fighters for local defence.
Bomber strength was less encouraging, with 19 Blenheims and 21 Hudsons, supported by 14 Dutch 139WHs, comprising the total force. Two squadrons of obsolete Vildebeests were available but could only be used in areas known to be devoid of enemy fighters. 205 Squadron had a few Catalinas left, with some loaned to the British by the MLD. 205 also included on its strength the Walrus seaplanes from the sunken Prince of Wales and Repulse. The arrival of the Dutch planes allowed for the release of the ancient RNZAF Short Singapores, which were despatched for service on Fiji. A handful of Wirraway trainers were being hastily converted into dive bombers, complete with a jury-rigged ‘trumpet of Jericho’ inspired by the German Stuka.
British and Commonwealth reinforcements were on their way to Singapore. Crews from 1 and 8 Squadrons, RAAF, had been despatched to Australia to bring additional Hudson bombers to reinforce the depleted bomber force. In addition, an entire wing of Hurricane fighters, 267 Wing, was on its way to the Far East, with 48 aircraft expected to arrive on the island by the middle of January. 232 Squadron was assigned to Singapore and they were being ferried aboard the carrier Indomitable, which had been repaired following the damage that had prevented her joining Force Z. Squadrons of Blenheim bombers were also on their way from the Middle East, flying via India and Burma.

Defence of Singapore, January 1942
The Japanese now had available many of the British airfields in Northern Malaya that had been captured during the initial offensive, with the British ground forces retreating to the southern Malay States. With airfields closer to Singapore now available, the Navy’s 22nd Air Flotilla and the Army’s 3rd, 7th and 12th Hikodan could maintain a much higher tempo of operations – bad news for the beleaguered defenders. Penang had fallen on the 17th of December without a fight, and Kuala Lumpur was soon threatened. The main road and rail routes to Singapore along the western coast of Malaya were relatively open.
Target Singapore
The year 1941 closed out with both the British and Japanese probing each other’s air and sea lanes. Japanese Navy bombers were kept busy patrolling the seas around Singapore, hoping to prevent reinforcements and supplies reaching the city. On the 18th of December a Mihoro Ku G3M attacked and sank a freighter heading south for Java; unfortunately, this turned out to be the neutral Soviet freighter Perekop on her usual route between Vladivostok and Surabaya. During these patrols, meetings between British and Japanese patrol planes were common. Sometimes these turned into violent confrontations, such as the encounter on Christmas Day between a Mihoro G3M and a Catalina of 205 Squadron. The Japanese took advantage of the superior range of their 20mm cannon to attack the flying boat with impunity – most of the British crew were wounded before the pilot finally managed to set his aircraft down and evacuate it just before it exploded. On the 31st of December, six Toko Kokutai H6Ks attacked the Dutch seaplane tender Helen, but the auxiliary put up a stiff fight and three of the flying boats were shot down or forced to land on the sea.

205 Squadron Catalinas
As the Japanese moved into their new air bases in the north of the peninsula, the British hit back when opportunities presented themselves. On Boxing Day Blenheims of 34 Squadron and Hudsons of 8 Squadron RAAF hit Sungei Patani, taking the Japanese completely by surprise. In a 30-minute bombing and strafing attack the intruders claimed dozens of aircraft destroyed, although in actual fact losses were just 9 Ki-51s with perhaps 50 other aircraft damaged. The losses were easily replaced and Japanese air power was not unduly affected, as was demonstrated the following day when 90th Sentai Ki-48s and 27th Sentai Ki-51s attack Port Swettenham, sinking the coaster Kudat as she was busy carrying out raiding operations along the coast.
Raids on Singapore began to pick up on the 29th of December, with Ki-48s of the 75th Sentai conducting a night bombing of oil storage facilities on the island whilst Navy G3Ms from the Genzan Ku attacked Seletar airfield and Keppel Harbour. The following night intruders were again in action, with small formations dropping bombs once again on the airfields, with several aircraft damaged. On the 1st of January 1942 five Army bombers hit Tengah airfield and 25 Mihoro Kokutai G3Ms did likewise at Seletar and Sembawang, where three Swordfish torpedo bombers were destroyed. The Japanese were concerned that the British were gathering additional air units and these raids were intended to gradually reduce the enemy’s strength whilst simultaneously undermining the morale of the ground crews who were charged with keeping the increasingly battered British air force in the battle. Night fighter Blenheims of 27 Squadron attempted to intercept on several occasions but rarely got close to the Japanese bombers.
The Japanese were also making constant attacks on the retreating British forces in support of the 25th Army. On the 10th of January, the 3rd Hikodan claimed dozens of trucks, tanks and guns destroyed on the roads north of Kuala Lumpur. Bombers also concentrated on the railway network, destroying trains, stations and tracks to disrupt British efforts to withdraw troops south. Several fully loaded trains were abandoned due to the track damage near the town of Malacca, so Blenheims from 62 Squadron were sent to destroy them. Kuala Lumpur itself was abandoned on the 11th and then taken over by Japanese. Captured Australian troops were forced by the Japanese to find and defuse booby traps on Kuala Lumpur and Port Swettenham airfields, with several of them being killed in the attempt.
Singapore Blitz
With the Japanese bomber force now settled in to their new airfields in the north of Malaya, a fierce and sustained blitz was planned on Singapore. The intention was to annihilate British air power by destroying aircraft on the ground at Singapore’s many airfields, and shooting fighters down in the air when they attempted to intervene. The assault began on the 12th of January with a fighter sweep by 72 Ki-27s over the city. Fourteen 488 Squadron Buffalos took off to intercept, in what was the first real action for the inexperienced New Zealand squadron. Two of the Brewsters were immediately shot, but both pilots bailed out and survived. Five more of the fighters were damaged. This sweep was to clear the way for 30 bombers, escorted by 42 Ki-43s, which targeted Seletar airfield, destroying a Buffalo and Walrus. Early that afternoon the Ki-27s returned, with Dutch Buffalos rising to challenge them. The Dutch pilots claimed four of the Type 97s shot down, but one of their number was lost. In the same interception effort 243 Squadron lost a fighter with the pilot killed, Japanese Navy Zeros making a big impression on the British. An attached 488 Squadron pilot was also shot down and killed. Six Buffalos were lost during the day, and three more damaged.

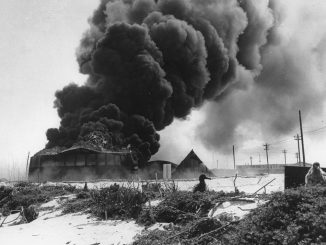
Smoke clouds over a deserted Singapore
Having been turned back by poor weather on the 12th, Navy bombers of the 22nd Air Flotilla tried again on the 13th. The weather still bad but some of them made it through to Keppel Harbor, whilst the others dropped their bombs on alternate targets. Eight 488 Squadrons Buffalos attempted to attack a group of Mihoro G3Ms, but they approached from a poor position and made easy targets for the gunners on the big Mitsubishis. Two Buffalos were damaged and forced to land, another was shot down. Later in the day Army bombers arrived to add to the destruction with escorting Ki-43s, which claimed four Buffalos shot down. 243 Squadron had attacked in piecemeal fashion with little coordination between elements, and they had paid the price.
The high attrition amongst the remaining Buffalo squadrons was very concerning, but newer aircraft were about to enter the fray. Convoy DM-2 arrived with 51 crated Hurricanes, and the pilots who would make up 232 Squadron. Malaya Command had high hopes for the Hurricanes, which had proved so decisive in the Battle of Britain. It was thought that the proven fighter would be more than a match for the supposedly ‘inferior’ Japanese fighters. Time would give the lie to this belief.
The Japanese themselves provided some relief to the defenders of Singapore. They incorrectly believed that most of the British aircraft had been withdrawn to Sumatra, and so changed the priority of their attacks from airfields to the military defences of Singapore city. On the 15th an erroneous report was received of a carrier in Singapore Harbour, and so Navy bombers set out to attack it. Upon sighting the harbour and finding no shipping worth the effort, they bombed Tengah. Army bombers soon followed to attack other targets. 488 Squadron again suffered heavily, losing one pilot killed and having most of their other Buffalos damaged. 243 Squadron also lost a pilot shot down, as did 2-VlG-V. the following day the Japanese bombers were unopposed when they appeared over the city.
The Battle for Muar
The British Malaya Command made some efforts to stop the Japanese. A key point on the road south from Kuala Lumpur to Singapore was the Muar River, the main crossing of which was mined by Australian engineers. When the Japanese column crossed the bridge, the mines were detonated, splitting the Japanese force and allowing British, Australian and Indian troops to destroy the forward element. There then followed a week of fighting where the Japanese attempted to cross the Muar River in captured barges and seize the Allied positions on the far side. RAF Far East Command contributed as many bombers as they could to the battle.

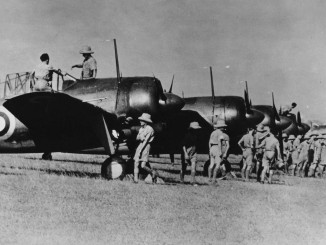
Martin bombers of the ML-KNIL over Malaya, 1942
On the 16th of January half a dozen Dutch 139WHs were escorted by RAF Buffalos to attack a concentration of Japanese vehicles on the Gemas-Tampin road, just north of the Muar River. They bombed the Gemas railway marshalling yards and nearby road traffic, and the escorting Buffalos strafed the road traffic as well. Soon afterwards more Buffalos escorted Blenheims with anti-personnel bombs to attack the same area. The next day Buffalos escorted Vildebeests to attack river barges near Muar, with the biplanes bombing and strafing several vessels on the river. On the way back to Singapore three Japanese fighters were encountered, all being claimed destroyed by the Buffalo pilots.
Muar was developing into a major battle as the Japanese attempted to cross the river, bridges having been destroyed by the retreating Indian and Australian troops. On the 18th Blenheims from 34 Squadron were escorted to the Gemas rail head, where they encountered 59th Sentai Ki-43s patrolling over the front. Swooping into the attack the Ki-43s shot down one bomber and badly damaged another. That same afternoon three Hudsons from 8 Squadron RAAF went after nearby targets, but suffered the loss of one escorting Buffalo shot down, whilst one of the bombers was heavily damaged and crashed on its return to Singapore, the entire crew being lost.
By the 19th the situation was very serious for the defenders in the Muar area, as the Japanese overwhelmed the Australian and Indian battalions. Providing what support they could, the Allied air forces despatched a force of three Dutch 139s and several Australian Wirraway dive-bombers, escorted by Buffalos, to Muar. Several ‘Type 96 fighters’ were encountered en route, but these were actually Ki-51 bombers engaged in attacking their own targets. Three of these were quickly claimed as destroyed by the Buffalos. During their attacks on Muar, one Wirraway was shot down by anti-aircraft fire and the 139s were forced to split up whilst bombing a suspected Japanese army HQ. the hapless Dutch were then attacked by 59th Sentai Ki-43s which happened upon them, two of the Martins were shot down and another was forced to crash land on its return to Singapore due to heavy damage.
These minimal efforts did little to slow the Japanese advance, nor did attempts by RAF Albacores to air-drop supplies to the 18th Division which was trying to hold back offensive. The Australian and Indian troops were soon ordered to destroy any equipment and withdraw back towards Singapore. Allied resistance on the Malay Peninsula was now at an end, as the remaining troops headed back to the island of Singapore – the question now was how long could this fortress hold out against the oncoming Japanese?
Leave a Reply