

German merchant raiders were even more active in the Indian Ocean than they were in the Pacific. The first Kriegsmarine surface vessels to reach the Indian Ocean was the pocket battleship Admiral Graf Spee, which made a brief foray into the Indian Ocean at the end of October 1939. The Graf Spee made a short detour during her cruise in the South Atlantic, intending to confuse the British as to her plans. She had little success at this stage of her career, finding and sinking the tanker Africa Shell, but finding little else worthy of her 11-inch main guns. After spending two weeks in the Indian Ocean she returned to the Atlantic, where she eventually met her fate after the Battle of the River Plate.
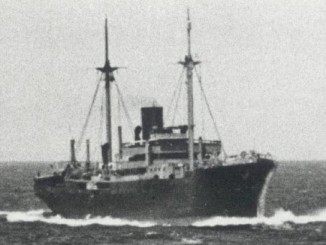
The first of the disguised merchant raiders to reach the Indian Ocean was the Atlantis, under Kapitän zur See Bernhard Rogge. Known as “Schiff 16” to the Germans and “Raider-C” to the British, she was armed with the usual array of 6-inch guns, torpedoes and mines. She also carried two Heinkel He114A-2 floatplanes which were flown by pilot Oberleutnant Richard Bulla, who was assisted by observer Oberfeldwebel Georg Borchert. Atlantis had entered the Atlantic by passing north of Iceland, then south through the Denmark Strait. At first she bore the disguise of the Soviet ship Kim, an auxiliary, including having her He114 painted with Soviet markings. Later on the voyage south she changed her disguise to appear as a Japanese ship, the Kasii Maru. Whilst on her way to the Indian Ocean she came across and sank the British cargo ship Scientist.
Atlantis passed the Cape of Good Hope on 10th May 1940. As she passed the most southern point of the African continent, she laid minefield off Cape Agulhas. The presence of a raider laying mines was bizarrely reported by propaganda radio from Berlin, so she changed her disguise for a third time to match the silhouette and marking of the Dutch motorship Abbekerk. On the 30th of May the first of Atlantis’s He114 aircraft was lost, leaving her with just a single machine for flight operations.

Atlantis to the Fore
On the 10th of June Atlantis pursued, fired upon and stopped the Norwegian motorship Tirranna. This vessel was kept as a prize but lacked the fuel to make the journey to France, so she was sent south to wait for a tanker to arrive and replenish her. It was a long wait, as it was not until a month later that the Atlantis came across British freighter City of Baghdad, destroyed her radio equipment with a well-aimed salvo of 6-inch gunfire and sent a boarding party. Among the papers captured before the ship was scuttled were a description of the Atlantis’ former Japanese disguise and a British and Allied Merchants Ship (BAMS) code book. Rogge therefore chose to augment his ship’s disguise by adding two new masts. 2 days later, on the 13th of July, Atlantis stopped the passenger liner Kemmendine. The liner was damaged by the raider’s gunfire and so was unsuitable for use as a prison ship, so she was sunk by a pair of torpedoes.
Having failed to capture a tanker with which to refuel the Tirranna, Rogge reached the rendezvous with her on the 29th of July intending to transfer 300 prisoners and enough of his own fuel to the motorship to allow her to reach Germany. However, whilst the transfer was underway the pair were approached by Norwegian freighter, the Talleyrand. She had seen the small boats moving between the Atlantis and Tirranna and had assumed one of them required assistance. After a brief chase the Talleyrand surrendered to Rogge. Her fuel was pumped onboard the Atlantis and her crew and some cargo transferred to Tirranna, which set off for France (she would be sunk in the Bay of Biscay by the British submarine HMS Tuna). The Talleyrand, after being used for target practice by Bulla in his He114, was scuttled. A few nights later Tirranna had a lucky escape when she was spotted by another German raider which declined to attack her, thinking that she might be a British auxiliary cruiser.
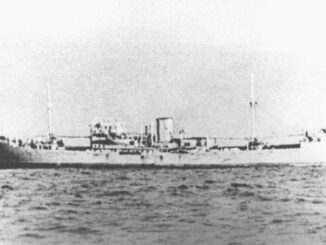
That raider was the Pinguin, the second hilfskreuzer to reach the Indian Ocean. Pinguin had rounded the Cape of Good Hope on the 20th August 1940. Designated “Schiff 33”, and labelled “Raider F” by the Royal Navy, the Pinguin was under the command of Kapitän zur See Ernst-Felix Krüder. She was armed with six 6-inch guns from an old pre-World War I era battleship, and 300 mines. Fitted with very reliable and efficient diesel engines, she also carried two Heinkel He114A-2 aircraft which were flown by Oberleutnant Walter Müller and Unteroffizier Hans Werner.
It was one of these aircraft, painted with British markings, which located a tanker south of Madagascar on the 26th of August. Messages were dropped ‘ordering’ the tanker to move away from a suspected raider on a course that would take her directly to the Pinguin. At first the tanker appeared to be obeying, but was later seen to be moving away at top speed. The Heinkel therefore used its grappling hook to rip away the ship’s radio aerials, before strafing and bombing her, causing her to stop for fear of having her volatile cargo hit. Pinguin soon arrived and captured the Norwegian Filefjell, with thousands of tons of aviation and fuel oil aboard. Whilst the ships were transferring some of this cargo to the raider, another tanker was spotted and Pinguin again gave chase, stopping the British Commander after a few salvos but not before SOS messages had been sent to and acknowledged by shore stations. Anxious to move away before help arrived, Krüder had the tanker torpedoed but soon came across a third ship, which stopped after a single warning shot. This was the Norwegian freighter Morviken, which was likewise scuttled.

After spotting a fourth ship, which was allowed to proceed unmolested, it was realised that the Filefjell could not be prepared adequately given the increased patrols the British would undoubtedly be sending to the area. Regretfully therefore her crew was taken off and she too was scuttled. Deciding to take the opportunity to change the Pinguin’s disguise from a Greek to a British ship, the Trafalgar, Krüder moved to a remote spot to carry out the work, which was finished by the 10th of September. Whilst the work was being done one of the Heinkels was sent on observation flights, but on landing it crashed, caught fire, and sank, although the crew escaped without harm. The spare Heinkel could not be assembled in anything other than calm seas, so for now the raider would have to manage without aerial observation. On the 12th, a freighter was spotted near Madagascar and Pinguin attacked, suffering a hit by the merchantman’s 4-inch gun that was thankfully a dud. The freighter, identified as the British Benavon, was worked over by gunfire and left in a pitiful state, before having her crew taken off prior to her scuttling. 4 days later Pinguin captured the motorship Nordvard, and sent her back to Bordeaux. A period of calm weather then followed which allowed the second He114 to be assembled.
On the 27th of September, near Christmas Island, the raider came across a motorship and stopped her with a single warning shot, no wireless SOS messages being sent. This ship was another Norwegian, the Storstad, a tanker with 12,000 tons of diesel aboard. She could also be used as an auxiliary minelayer, and was converted into such by stripping out accommodation spaces. She was commissioned as auxiliary in the Kriegsmarine and renamed the Passat. The two ships then launched an ambitious minelaying campaign, between them sowing fields off Melbourne, Sydney, Newcastle, Hobart and Adelaide. These minefields claimed the liners Cambridge and Hertford, the neutral US merchant City of Rayville, the coaster Nimbin, and a trawler.
The Pinguin required a period of refit prior to moving down to South Georgia to attack the Norwegian whaling fleet. Soon after finishing engine refit on November the 17th, a freighter was sighted and stopped her with warning shots – she was the British Nowshera. Her crew was taken off and she was scuttled. On the 20th, another cargo ship was sighted. The Heinkel was sent to rip away her aerials, which failed on first attempt. A message was then dropped ordering her to stop, which was ignored, whereupon the seaplane dropped 2 bombs in front of her. A second attempt to destroy the ship’s aerials was made, during which the He114 came under damaging AA fire. A fuel tank and one of the floats were damaged, forcing the aircraft to land near the victim and wait for Pinguin. The target vessel continued to move away but the Pinguin gradually caught up. Warning shots were enough to bring her to a stop, and the ship, the refrigerated cargo ship Maimoa, was scuttled. Meanwhile the Storstad had spotted another freighter and was trailing her. Pinguin waited until dark, then opened fire on this ship, the reefer Port Brisbane, and brought her to a stop. Most of her crew were rescued from lifeboats but one boat could not be found. The straggler was shortly picked up by the cruiser HMAS Canberra, which was patrolling for raiders – a narrow escape for the Pinguin.
The Atlantis, meanwhile, was likewise enjoying the rich pickings available on the Indian Ocean trade routes. On the 24th of August, a ship was sighted acting suspiciously and Rogge decided she might be a Q-Ship – a British ship disguised as a merchant but with hidden guns. Atlantis therefore opened fire without warning, but it turned out that the target was a normal freighter, the King City. Her crew was taken off and she was sunk by gunfire. On the 9th of September Atlantis encountered the motor tanker Athelking, shelling her to force her to stop. Despite Rogge’s hopes, the ship was too badly damaged to be taken as an auxiliary, so she was scuttled. Two days later Atlantis sighted another ship and decided to use her seaplane to help capture it. Bulla’s He114 was launched, but as it approached the target transmitted a distress call. The He114 then bombed and strafed her, before stripping away the radio antenna with its hook. Warning shots from Atlantis then brought the ship to a stop, but an emergency transmitter resumed sending SOS messages so another volley of fire was unleashed. The ship turned out to be the freighter Benarty, which was boarded and rigged with demolition charges, which sank her.
For the next week Atlantis drifted to conserve fuel and carry out repairs. Whilst drifting, a passenger liner was sighted and so the raider gave chase. Distress signals were transmitted so Rogge had her fired upon until they stopped. The vessel was the French Commissaire Ramel. Which had her crew taken off before she was sunk by gunfire. Repairs completed, Atlantis then headed to the Sunda Strait in the Netherlands East Indies, encountering an old, filthy neutral Yugoslav freighter called the Durmitor. With 400 prisoners aboard the raider the situation was so pressing that Durmitor was captured anyway, assigned a prize crew, and the prisoners were sent on a hellish 5-week journey to Italian-controlled Mogadishu in Somaliland.
On November 8th, she came across the Norwegian tanker Teddy, and boarded her for ‘inspection’, claiming to be the British auxiliary cruiser HMS Antenor. She was kept in company until her cargo of diesel could be transferred to Atlantis. Two days later whilst on patrol in his He114, Bulla sighted another tanker. Rogge tried same ploy of pretending to be a British cruiser, and so the Norwegian tanker Ole Jacob was stopped and taken by a boarding team. The next day Atlantis sighted another ship and allowed her to get closer, before dropping her disguise and raising her battle flag. The ship failed to stop so Atlantis had to shell her bridge and radio room to force her to surrender. The target proved to be one of the most important ships ever captured by a raider, for she was the freighter Automedon, carrying military supplies for Singapore and top secret documents that were to prove very useful to the Japanese during their conquest of Malaya in 1941. After this success Atlantis rendezvoused with her two captured tankers, scuttled the Teddy and sending the Ole Jacob to Japan. The aviation spirit she was carrying was used to barter for supplies, including the E8N seaplane that was supplied to the Orion.
The Pinguin was continuing on to the Antarctic. On the way the Storstad again reported a ship in sight on the last day of November, with the Pinguin’s first shot disabling her steering gear. This freighter was the Port Wellington, a sister ship of Port Brisbane, and her crew were likewise caputured before their ship was scuttled. By this time Pinguin had collected over 400 prisoners, so Krüder arranged for the Storstad to be sent back to Europe with them. On the way she was to meet and refuel the Atlantis. The two raiders met near Kerguelen Island, far in the southern reaches of the Indian Ocean on the 8th of December with the Storstad arriving the next day. After the supplies and prisoners were transferred between the ships she set sail, eventually arrived in France on the 4th of February 1941.
The Norwegian Whaling Fleet
Atlantis remained at Kerguelen Island for 26 days of repairs, whilst Pinguin set off for the Antarctic. En-route to South Georgia she started intercepting messages between the Norwegian whalers, which were operating under contract to the British. Krüder learned that the whaler Solglimt and factory ship Ole Wegger were to meet on January 13th 1941 to transfer a cargo of whale oil. Pinguin arrived at the rendezvous point the following day under cover of bad weather, and captured both ships without a struggle or an SOS being sent. Four nearby whalers also surrendered, but 3 others escaped. Pinguin then sailed towards the nearby factory ship Pelagos, which was well lit in foggy conditions. Again the target was captured quickly, and her seven whalers were ordered by Pelagos’ captain to return to her – so they were captured too. All of the prizes met at “Point Andalusia”, a spot north of the island of Tristan da Cunha where they would meet prize crews from other ships despatched on the supply ship Duquesa. She reprovisioned the Pinguin, but was then scuttled having outlived her usefulness. The factory ships and whalers were sent to France, all ships but a pair of whalers avoided the British blockade and arrived safely in France with their valuable cargo of whale oil. Pinguin then returned to Kerguelen and met with supply ship Alstertor on March 13th, which delivered amongst other supplies a new Ar196 seaplane.
After completing her repairs at Kerguelen, Atlantis headed for the Arabian Sea. Her He114 was sent on constant scouting missions, hoping to come across more unescorted enemy shipping. On the 23rd of January, 1941 the He114 spotted a ship, and Atlantis followed a course that allowed her to catch the quarry the next day. The target was lost, and then found her again. The He114 was launched again and made an attack that tore away the ship’s antenna on first attempt. Atlantis then shelled her to a stop. The captured ship was the British freighter Mandasor, which was sunk by charges. The He114 had landed on the sea near Atlantis’ motorboat, but had capsized. The plane had to be sunk by gunfire. A week later Atlantis captured the freighter Speybank and turned her into an auxiliary minelayer, which was used to mine the approaches to Cape Town.
On the 2nd of February Atlantis came across the Norwegian tanker Ketty Brøvig and captured her and her cargo of fuel oil and diesel. On the 14th, Rogge took his little flotilla to meet the pocket battleship Admiral Scheer and refuel her. Including the big warship’s prizes 5 ships arrived at the designated meeting point– the largest gathering of German ships outside European waters during the war. The Tannenfels was sent to France with prisoners from the prizes. The Speybank stayed with Atlantis, whilst the Ketty Brovig sent to meet Pinguin’s supply ship Coberg. Both were surprised by the Allied warships HMAS Canberra and HMS Leander, and sunk – evidence of the British and Australian Navy’s increased determination to find and destroy the raiders. Before long, the Allies would have more success to celebrate.
The Pinguin had by this time moved to the sea lanes north of the Seychelles, sending her Ar196 on constant air patrols. On the 25th of April, she found the freighter Empire Light and brought her to a stop by shelling. The ship was too damaged to be taken as a prize, so she had to be scuttled. 2 days later the seaplane found another target, but before Pinguin could intercept she came across yet another freighter, whose crew abandoned ship after shelling destroyed her defensive gun. This ship was the Clan Buchanan, whose steering gear destroyed in the attack so she was scuttled. On the 7th of May, the raider found and damaged the tanker British Emperor, but she sent SOS signals which fatefully for the Pinguin attracted the attention of the Royal Navy cruiser HMS Cornwall.
Two days later, May the 9th, 1941, lookouts on board the Pinguin sighted a cruiser on the horizon and so Krüder attempted to move away before his ship was spotted. Cornwall’s Supermarine Walrus seaplane was airborne and overflew the Pinguin to challenge her. Krüder attempted to pass his ship off as the British freighter Tamerlane but the crew of the Walrus was suspicious – the Pinguin’s crew having overdone the ineptitude of their flag signalling, in an attempt to come across as bumbling merchant sailors. The Tamerlane however was known to belong to a shipping line which prided itself on good seamanship, and so Cornwall moved in to investigate. The cruiser challenged the Pinguin which failed to stop. Krüder then decided to take a risk and attack the British warship, hoping to get off a decisive first strike – and opened fire on the cruiser. Despite some initial damage and problems with her turrets, Cornwall was able to withdraw out of range of the raider’s guns, before relying on the superior range of her 8-inch guns and the support of her Walrus, which provided range adjustments. Inevitably, the heavier firepower of the cruiser began to tell and she scored a direct hit on the Pinguin’s mine store, which caused her to blow up and sink immediately. 214 prisoners and 341 of the Pinguin’s crew were killed, including Kapitan Krüder.
Atlantis, for her part, had some encounters with neutral ships but no more success finding enemy ships. She was briefly transferred to the South Atlantic, leaving the Indian Ocean on the 8th of April. There she sank several more ships including a liner with several Americans aboard, including a Life magazine photographer, who took several pictures of the disguised Atlantis. After this incident she re-entered the Indian Ocean, passed south of Australia, and transited to the Pacific. She captured the freighter Silvaplana between New Zealand and the Society Islands. Then she rounded Cape Horn and made for Germany, but she was found and sunk by HMS Devonshire on the 22nd of November, 1941. Most of her crew was rescued by U-boats.
The Kormoran
The last of the German raiders to see action in the Indian Ocean was the Kormoran, commanded by Korvettenkapitän Theodor Detmers. She was designated Schiff 41 by the Germans, but known as “Raider G” to the British Admiralty. She was the biggest of the raiders, with twice the displacement of the Komet. Her guns were taken from the World War I-era battlecruiser SMS Seydlitz. Her air complement consisted of two Arado Ar196A-1 seaplanes, piloted by Oberleutnant Heinfried Ahl, and she was equipped with a light speed boat, the LS-3, 6 torpedo tubes, and 350 mines. Kormoran departed Germany on the 3rd Dec 1940. She sank eight Allied ships in the Atlantic, and met the Pinguin after her expedition to the Antarctic on February 25th 1941, and then met Atlantis on the 21st of April.

Kormoran entered the Indian Ocean on May 2nd 1941. Soon afterwards, she learned of the destruction of the Pinguin by HMS Cornwall. She therefore changed from a Soviet disguise that she had been using for several weeks to a Japanese one. She made for the Bay of Bengal, which had thus far been avoided by the Germans, arriving there on the 19th of June. She was briefly chased by an auxiliary cruiser, HMS Canton, but escaped. On 26th she encountered the Yugoslavian freighter Velebit at night, and shelled her to a stop. The crew was taken off and the ship was left to drift, eventually running aground on the Andaman Islands. Some of her crew survived at sea for 18 weeks in a lifeboat. Later that same day she encountered the Australian freighter Mareeba, which was stopped and a prize crew sent to board her. On board they learned that the light cruiser HMS Durban was nearby, so Detmers decided to depart the bay before she managed to find the raider.
Kormoran spent 2 weeks drifting to repair her engines, which were struggling due to poor quality bearings. Whilst adrift she also changed her disguise to that of a Dutch merchantman. She then spent the next 2 months cruising the shipping lanes of the Netherlands East Indies, finding nothing in the way of Allied shipping. Detmers therefore took his ship to the Arabian Ocean. Her Arado was used extensively to search for enemy shipping but found nothing. Then, on the 23rd of September, an alert deck officer spotted a lit ship sailing at night. Lights usually signified that a ship was neutral, but this one turned out to be the Greek freighter Stamatios G. Embiricos. Low on fuel, the caputured ship was no use as an auxiliary, so she was scuttled. The Arado was later used to find 2 missing lifeboats from the freighter. No further luck was to be had in this area, so the Kormoran headed to a rendezvous with the supply ship Kulmerland off Australia. This ship had sailed from Japan with a cargo of fuel and metal for repairing Kormoran’s troublesome bearings. The meeting occurred on the 16th of October, with the ships heading their separate ways soon afterwards.
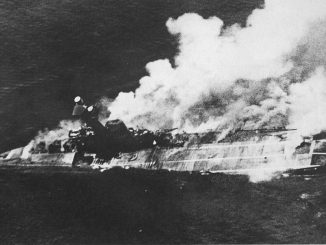
On November 19th, west of Australia, Kormoran sighted an unknown ship. Is itcame closer it was eventually recognised as a Perth-class cruiser, the HMAS Sydney – a powerful ship easily capable of destroying the raider. Detmers knew that his only chance was to let her get very close. The ships exchanged signals where Koromoran pretended to be the Dutch ship Straat Malaaka, a ruse which at first appeared to work. By 1730 with the light fading, Sydney was within 1,000m so Detmers gave the order to open fire. Sydney was surprised and took severe damage from this first volley, and returned fire that was inaccurate and missed. Kormoran was able to get away 8 more volleys and a torpedo hit before Sydney’s rear turrets finally loosed some accurate shots that hit the Kormoran’s engine room and started a fire. The engine room firefighting equipment was also destroyed. Sydney slowly moved away, still under fire – a total of 450 rounds of 6-inch shells were fired at her. As she disappeared into the falling gloom, a huge explosion was seen – Sydney had sunk with all hands, 645 officers and men.
Meanwhile, it was obvious that the Kormoran was also doomed as her fires raged out of control and threatened to set off the ship’s store of sea mines. 320 of the raider’s crew escaped before she sank. Sydney had not radioed to the shore what was happening so the survivors were forced to endure several days at sea before being picked up gradually by passing ships, some of them remaining adrift for eight days. The survivors were interred in PoW camps for the rest of the war, eventually returning home in 1947. The wrecks of both Kormoran and Sydney were found in 2008.
Leave a Reply